
Understanding Processor Sockets and Generations
Different Socket Types Explained
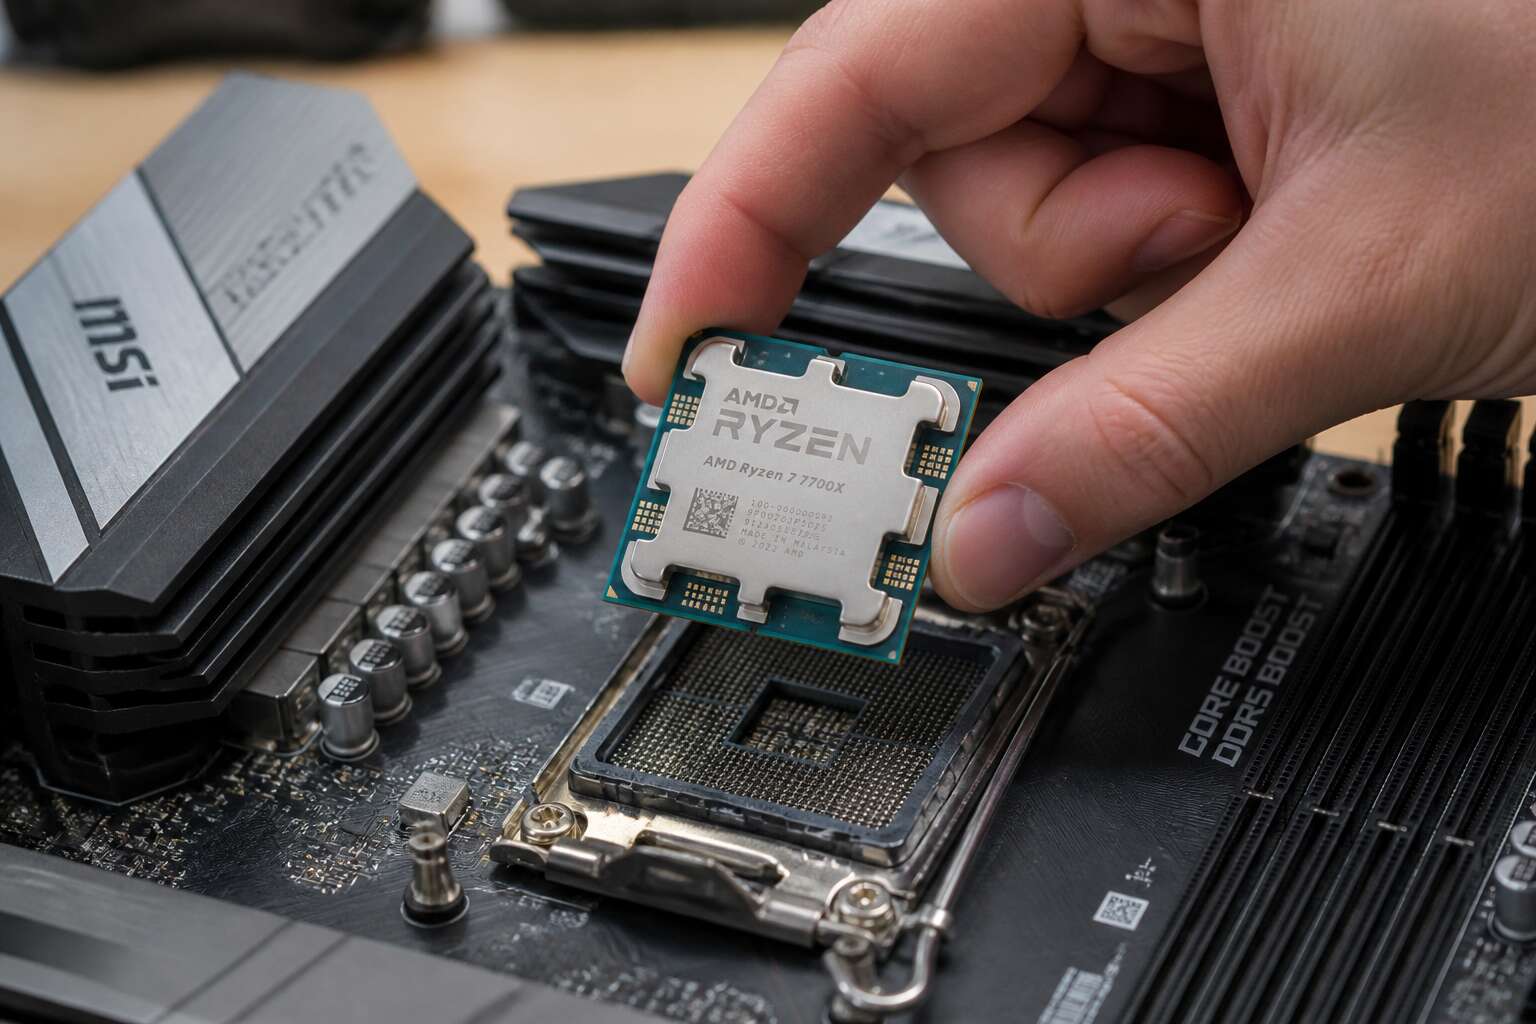
Nearly every PC builder in South Africa has a drawer of mismatched parts. A processor might look perfect, but if its socket does not match the board, the whole system sits idle. The socket is the physical interface between CPU and motherboard, and it decides everything about your upgrade path.
Intel uses LGA (land grid array), where pins sit on the motherboard. AMD’s older AM4 uses PGA, with pins on the processor itself. Newer AMD boards like AM5 switch to LGA too. Each generation of CPU generally demands a matching chipset and socket revision, so the motherboard and cpu compatibility check becomes non-negotiable.
- LGA 1700 for Intel 12th to 14th gen
- AM4 for Ryzen 1000 to 5000 series
- AM5 for Ryzen 7000 and newer
That is why a motherboard and cpu compatibility check matters before you spend a cent. I have seen builders swear by a specific board, only to find the CPU will not seat at all. A quick look at the socket and the supported generation saves you a long trip back to the store.
Intel Socket Compatibility Across Generations
Intel moves sockets quickly. In the last decade, mainstream boards swapped through four socket designs, leaving South African builders with limited upgrade options. LGA 1151 covered 6th and 7th gen, then returned for 8th and 9th gen with a revised layout. LGA 1200 lasted just two generations. LGA 1700 stretched across three:
- 12th gen Alder Lake
- 13th gen Raptor Lake
- 14th gen Raptor Lake Refresh
That span had complications. Older LGA 1700 boards needed BIOS updates to accept newer processors, and some budget boards never received them. I have seen 14th gen chips fail on early boards that never got updated. The motherboard and cpu compatibility check therefore has to go deeper than the socket. The chipset, the BIOS revision, and the power delivery all determine whether a chosen CPU will actually run. A motherboard and cpu compatibility check that stops at the socket alone misses the real problem.
AMD’s Socket History and Forward Compatibility
AM4 held on for five generations, yet that long life masked a mess of board revisions. Older X370 and B450 models often received BIOS updates late or never, leaving users with a 3600 that worked and a 5800X that would not post. The socket stayed identical, but the firmware split the difference.
AM5 promises support until 2027, which sounds reassuring until you factor in the chipset differences between B650 and X670E. Here is the part that matters: a motherboard and cpu compatibility check must go beyond the socket shape. It has to include the BIOS revision, the VRM capacity, and the manufacturer’s update history. I have watched AM4 users swap boards for no other reason than a missing update. A motherboard and cpu compatibility check reveals that forward compatibility is a promise, not a guarantee.
How to Locate Your CPU Socket
Most PC builders never look at the socket directly, yet that stamped metal frame decides every future upgrade path. Locate it by removing the side panel and following the CPU cooler’s shadow across the motherboard. The socket designation is often printed in faint white lettering near the retention arm, or hidden beneath the edge where the PCB meets the heatsink mounts. You may need a light and a patient eye. Generations are stamped here, sometimes in ink, sometimes in the shape of the plastic frame itself.
The physical location matters more than the naming convention. An AM4 socket accepts a 3600 today, and a 5800X may settle into the same hole tomorrow, yet the firmware decides whether it boots. That is what a motherboard and cpu compatibility check hunts for in the dim interior of the case.
Some boards hide their identifiers well, so proceed methodically:
1. Unplug the machine and ground yourself.
2. Locate the socket name, such as LGA1700 or AM5, printed on the PCB near the CPU bracket.
3. Note the revision number and any BIOS version stickers on the motherboard’s underside.
The socket marks the physical boundary; the generation defines which processors the board will support. You cannot read BIOS with your eyes, but the socket gives the starting point. Open the case, study the letters, and begin the compatibility check there.
Matching Chipsets with Your Processor
What the Chipset Does for Compatibility
The chipset acts as the negotiator between your processor and the rest of the motherboard, deciding which features deserve attention and which quietly wait in the background. While the socket ensures physical fit, the chipset determines whether your prized CPU receives full memory bandwidth, native USB speeds, or overclocking privileges. For Intel, a B760 board happily accepts a Core i5 but refuses to unlock the CPU multiplier, a freedom reserved for Z790 owners. This is why a motherboard and cpu compatibility check must extend far beyond pin counts.
AMD offers a similar social hierarchy, though their chipsets behave with more patience. Usually, certain entry and midrange options can support newer processors. However, older boards may require a BIOS update to recognise the new arrival. Consider this before you shop:
– Entry chipsets often limit PCIe lane allocation
– Midrange chipsets balance storage and memory options
– Flagship chipsets enable advanced overclocking controls
Pairing a 7000 series processor on a B650 board works smoothly, but sliding it into an A520 chipset could produce a silent stare instead of a boot screen. That subtlety frequently trips up even seasoned assemblers. The socket gets all the headlines, yet the chipset quietly manages the compatibility handshake.
Intel Chipset Feature Tiers
Intel’s chipset naming scheme follows a strict hierarchy. H-series boards handle basic office builds, B-series boards serve most gamers, and Z-series boards exist for enthusiasts who demand unlocked multipliers. That tier structure is central to any motherboard and cpu compatibility check.
- H610/H810: entry tier, no CPU overclocking, fewer PCIe lanes
- B760/B860: middle tier, memory overclocking, locked multiplier
- Z790/Z890: top tier, full overclocking, flexible lane allocation
A processor like the i5-14600K expects the freedoms of a Z-series platform. Pair it with an entry board and you forfeit both memory tuning and PCIe 5.0 storage speeds. That hidden limitation frustrates many first time builders in South Africa, where premium boards carry a hefty import premium. The socket may look identical, but the chipset tier decides which processor features stay active.
AMD AM4 and AM5 Chipset Differences
AM4 boards are the old workhorses, anchored by chipsets like B550 and X570. AM5 boards bring B650 and X670 to the table. The chipset tier still decides what your processor can actually use. A Ryzen 7 5700X on a budget A320 board runs, but you lose PCIe 4.0 support and memory overclocking. That reality makes any motherboard and cpu compatibility check hinge on the chipset, not just the socket fit.
AM4 sticks to DDR4 memory, while AM5 demands DDR5. AM5 also offers PCIe 5.0 lanes, but only on specific boards:
- B550: PCIe 4.0 for GPU and storage
- X570: PCIe 4.0 across the board
- B650: PCIe 5.0 for storage
- X670: dual chipset design, maximum connectivity
Ignore the chipset tier and you might overpay for a board that cripples your processor’s potential. For South African builders dealing with erratic stock levels, that single check prevents a costly mistake.
The Critical Role of BIOS Updates
Nearly 40% of returned motherboards in South Africa show no physical damage, only a mismatched BIOS. That makes a motherboard and cpu compatibility check incomplete without verifying firmware support. Your chosen processor might share the correct socket and chipset tier, yet the board ships with an older BIOS that fails to recognise it entirely. B550 boards with Ryzen 5000 series often need a flash update before first boot. This dependency between hardware and software escapes serial numbers. A thorough inspection of the vendor’s CPU support list reveals the required firmware. For a practical pairing:
- Find the exact processor on the manufacturer’s site.
- Confirm the required BIOS version.
- Check for USB flashback capability.
I have seen builds fail over this exact issue! Silence here costs you a bench session. Your local retailer rarely checks these details.
Using Manufacturer CPU Support Lists
Every motherboard vendor publishes a CPU support list. That document decides whether your processor will run on a given board. South African builders order parts online and wait weeks for delivery. A motherboard and cpu compatibility check that ignores this list can end in a non-booting system. The chipset tier defines the feature set, yet the support list defines real-world possibility. Vendors validate each processor against specific firmware revisions and record the outcome. Entries show:
- the exact processor model
- the minimum BIOS version
- the chipset tier used for validation
I have seen a builder pair a B550 board with a Ryzen 5000 CPU, and found the support list marked verification pending for that exact chip. That anxiety is avoidable. Open the manufacturer site, locate your board model, and scan the CPU support page for your generation. That single column completes the motherboard and cpu compatibility check before money changes hands.
Physical and Power Supply Requirements
Mounting the CPU Cooler Correctly
Physical clearance matters as much as the socket itself in any motherboard and cpu compatibility check. A CPU cooler that fits the socket can still obstruct your RAM slots or tower case side panel. Measure your case’s CPU cooler height limit before buying. Power supply requirements demand equal attention. Modern CPUs pull sudden, sharp current spikes. Your PSU needs stable 12V rails and the correct EPS connector, 8-pin or 4+4, seated firmly. Trust me, a loose EPS connection causes boot failures that trick you into suspecting the motherboard.
Mounting the CPU cooler correctly involves even pressure across the heatsink. Uneven mounting causes high temperatures and throttling. The correct sequence is simple:
1. Apply the correct thermal paste amount.
2. Hand-tighten screws in an X pattern.
3. Tighten fully only after all screws catch.
These steps prevent the cooler from rocking. A loose mount fails your motherboard and cpu compatibility check, even with a perfect socket match.
VRM Quality and Power Delivery
The motherboard and cpu compatibility check rarely accounts for the voltage regulator module, and that omission shapes real world performance. VRMs convert the PSU’s 12V supply into the lower voltages a CPU needs. Their phase count and MOSFET quality decide whether your processor holds boost clocks or sags under a sustained load.
Physical requirements extend to the power supply’s transient response. A CPU can burst well beyond its TDP for milliseconds. Your PSU must handle these spikes with tight voltage regulation.
When reviewing a board, I inspect the VRM cooling. A heatsink on the MOSFETs matters far more than a decorative cover.
Motherboard Size and Case Clearance
A board that does not fit your chassis is worthless. The motherboard and cpu compatibility check usually ignores case clearance, yet a single millimetre short ruins the build. Every form factor carries specific dimensions; ATX, EATX, micro ATX, and mini ITX each place standoffs in different positions. The I/O shield, rear panel cutout, and chassis edge must align exactly.
Your PSU throws its own physical weight into the equation. The CPU power header sits at the top of the board, often near the rear exhaust fan. Cable length and routing gaps decide whether you can secure the side panel at all. Some boards demand two 8-pin CPU connectors, which adds strain and clutter. Measure first, buy second!
Before ordering, verify these clearances:
– GPU length against the chassis limit.
– Tower cooler height against the side panel.
– PSU depth against front radiators or drive cages.
Memory and PCIe Lane Sharing
A system with ample wattage can still refuse to boot. The motherboard and cpu compatibility check must verify the PSU provides the correct CPU power connectors. Standard 8 pin EPS exists, yet many AM5 and LGA1700 boards add a second 8 pin for heavy overclocking. Leave those cables unplugged and the CPU will never reach full boost.
Memory and PCIe lane sharing form another hidden constraint. The processor allocates a fixed number of lanes. Installing a second M.2 SSD often forces the primary GPU slot from x16 to x8. For gamers the difference is negligible, but for machine learning or video editing it can reduce throughput. Every board publishes a lane sharing diagram in its manual; read it.
Online Tools and Verification Methods
Official Manufacturer Compatibility Tools
Official manufacturer tools remove the dread from any motherboard and cpu compatibility check. Intel and AMD each publish validation pages that accept your exact model numbers and return a clear verdict. These tools understand silicon revisions and microcode corrections, details that third-party databases often miss. I once watched a popular site approve a pairing that the vendor’s own checker rejected. That experience taught me to trust the source!
The verification routine follows a strict sequence:
- Locate the support page for your board or processor.
- Enter the model number printed on the box.
- Read the compatibility result.
That result comes straight from the engineering team. Third-party tools help with pricing, but they never replace official confirmation. The careful buyer consults the manufacturer first, saving themselves hours of cable swapping and muttering.
Third-Party PC Builder Resources
Third-party PC builder resources sit somewhere between convenience and caution. PCPartPicker and similar sites offer instant filtering across thousands of parts in one database. They excel at pricing and spotting obvious mismatches. But these platforms rely on user-submitted data. A pairing might show as compatible because one contributor made it work with a BIOS update that no one documented.
Use verification sites as a first pass, not the final word. Cross-checking with at least two independent sources is the minimum standard.
Good third-party tools handle these tasks:
– Compare prices across South African retailers
– Flag physical clearance issues in your chosen case
– Suggest alternative parts when your board lacks the right header
None of them replace the motherboard and cpu compatibility check that you run yourself against manufacturer documents.
Asking the Community for Help
Forums outpace manuals when reality bites back. Reddit’s buildapc community, South Africa’s Carbonite board, and Overclock.net host live threads where users document every mismatch. I search my exact board and processor model, then compare user signatures for VRM or memory context. Community resources worth checking:
- Carbonite’s hardware section
- r/buildapc daily thread
- Overclock.net build logs
This crowd sourced signal reveals BIOS quirk patterns and silent failures that support lists miss. Yet community wisdom is a lead, not a verdict. One builder’s success may hinge on a beta BIOS or a lower wattage CPU. Official documents remain the final arbiter for any motherboard and cpu compatibility check, while community evidence covers the practical edge cases.
Avoiding Common Compatibility Pitfalls
Don’t Assume Generation Equals Compatibility
Generation numbers are unreliable. A 14th Gen CPU is not automatically compatible with every board that supported the 12th Gen, and the physical socket may look identical while the pin layout tells a different story. The motherboard and cpu compatibility check demands a hard look at exact model numbers, not the era printed on the packaging. I have watched builders attempt the fit, convinced by matching generations, only to meet a silent, black screen.
Common pitfalls include:
- Trusting a generation name instead of counting the actual socket pins
- Assuming a refresh model behaves exactly like its predecessor
South African builders should verify each processor model against the board manufacturer’s validation list. The generation label offers a rough story, but compatibility lives in the details. Always check the chip itself!
Incorrect BIOS Version Headaches
The motherboard and cpu compatibility check often fails at the BIOS screen, not the socket. A board may physically accept a processor, yet refuse to post because its firmware predates the CPU’s requirements. I have seen this exact scenario with South African builders who received boards manufactured months before a processor launched. The BIOS version determines whether the system starts at all.
Signs that your BIOS version is the problem include:
– The system powers on with fans spinning but no display output
– The board’s debug LED stops at the CPU indicator
– The board requires a compatible older CPU to perform the update
That last point creates a frustrating loop when no loaner CPU is available. Retailers in South Africa rarely offer a BIOS update service for boards bought elsewhere, and the warranty does not cover a failed post. The CPU sits correctly in its socket, yet the board stays silent until the firmware catches up.
Power Connector Mismatches
When performing a motherboard and cpu compatibility check, power connector mismatches rarely appear on paper. The same socket may fit, but an 8-pin EPS connector versus a 4-pin can stop the board from posting.
I have seen boards with an additional 12-pin CPU power header that older PSUs simply cannot feed. The CPU sits ready, the board lights up, yet no boot occurs because one connector remains empty. This is not a CPU failure, it is a wiring issue.
- Check the CPU power header count beside the socket.
- Confirm the PSU has separate EPS cables, not GPU cables.
- Inspect the motherboard 24-pin connector for bent pins.
Overlooking RAM Speed Limitations
Most people focus on the socket, but the memory controller is where the real motherboard and cpu compatibility check lies. A CPU’s official memory speed is a baseline, not a ceiling. If you install RAM rated for 3600MHz on a board that only validates 3200MHz, the system will often POST at the lowest common denominator, typically 2133MHz. That wastes performance.
- Check the CPU’s official memory controller speed.
- Review the motherboard’s QVL for tested RAM kits.
- Update the BIOS before enabling EXPO or XMP.
Ignoring these steps turns a simple upgrade into a frustrating session of troubleshooting. You might think the CPU is faulty, but the memory is the real culprit. Always match the RAM speed to the board’s validated list. The motherboard and cpu compatibility check should never stop at the socket. It ends at the memory slots.
Verifying Before You Buy
In South Africa, a wrong spec can cost you restocking fees and weeks of waiting. The motherboard and cpu compatibility check only works when it covers the entire assembly, including the memory controller, the VRM layout, and the physical clearances inside the case.
I keep a physical checklist beside my keyboard. CPU support list, memory QVL, BIOS revision, EPS connector type, cooler clearance. Each entry is verified before I open the checkout page.
- Read the CPU release date against the motherboard’s shipping BIOS.
- Check the RAM kit model on the QVL, not just the speed.
- Measure the case clearance with the GPU installed.
That discipline has saved me from three separate returns this year. The motherboard and cpu compatibility check deserves that level of attention!
Testing After Installation
The motherboard and cpu compatibility check looks perfect on paper, but the real proof comes when the system first posts. That single beep tells you more than any spec sheet. I run a memory stress test before mounting the side panel, then confirm turbo clocks and voltages with HWInfo.
Physical verification matters equally. The EPS cable must seat with a firm click. The cooler bracket tension should feel even across all corners. If the CPU temperature climbs past 85 degrees Celsius within minutes, reseat the cooler.
- Check POST codes against the manual.
- Confirm RAM runs at rated speed in BIOS.
- Listen for coil whine near the VRM heatsink.
When something fails, isolate one part at a time. Reseat the graphics card, swap RAM to alternate slots, or clear the CMOS. The motherboard and cpu compatibility check ends only after a full benchmark loop completes without a reboot.
0 Comments