
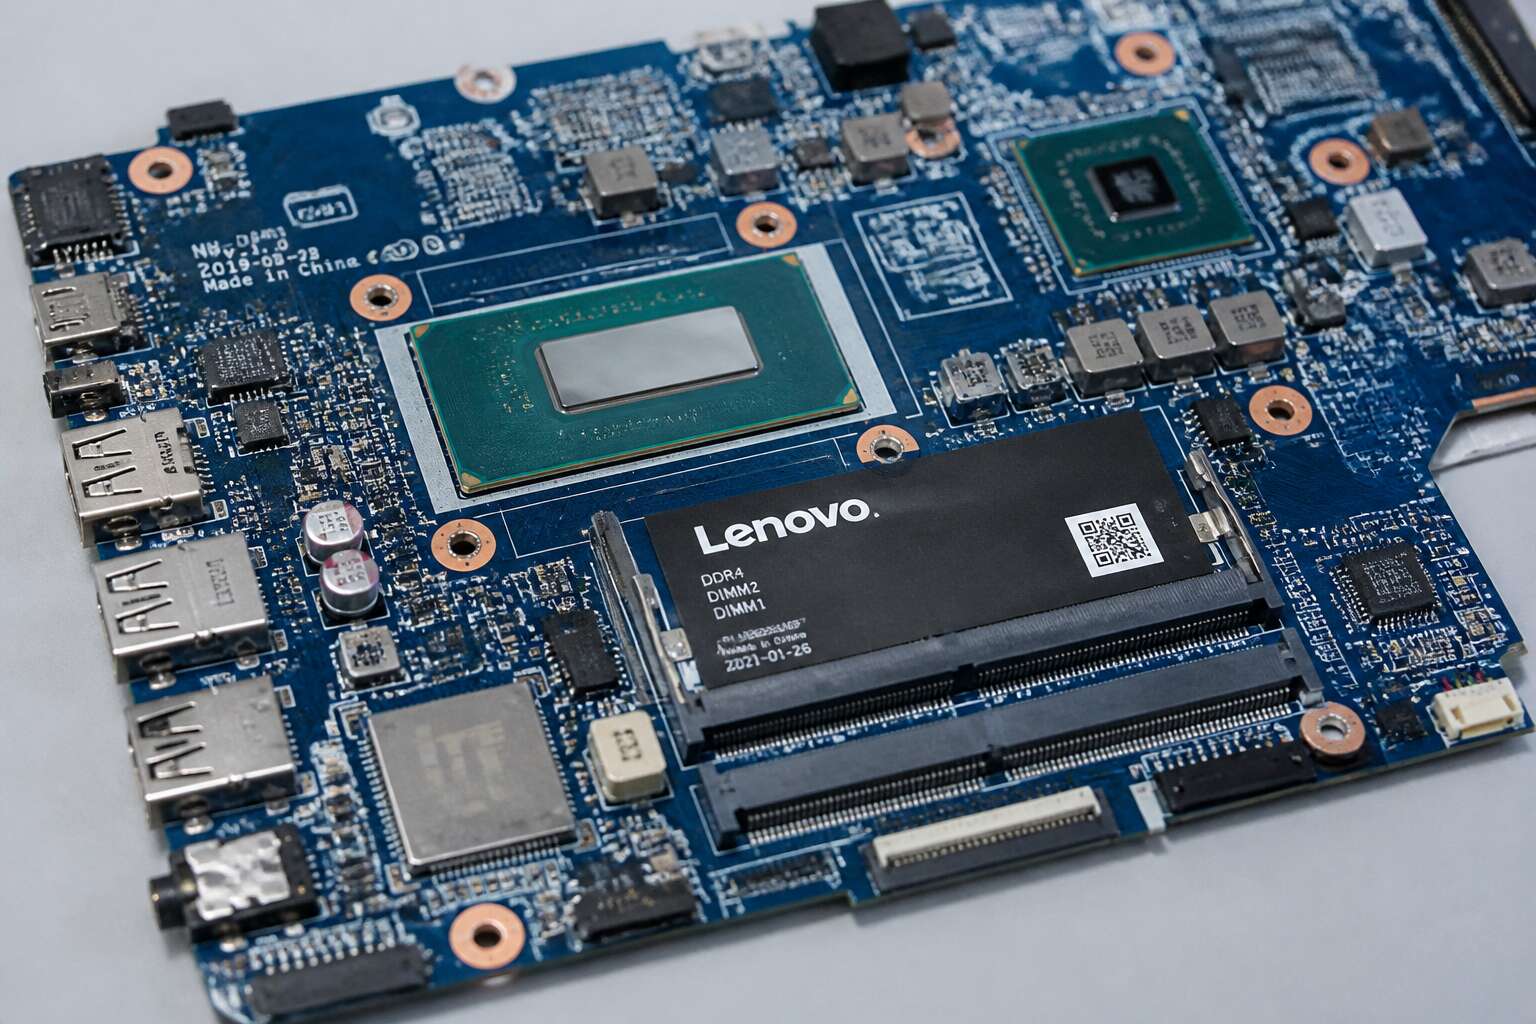
Key Factors to Consider When Choosing a Replacement Motherboard
Compatibility with Your Specific Lenovo Model
Finding the right motherboard for lenovo laptop repairs starts with one honest truth. Many people assume a generic part will work, but Lenovo often engineers proprietary power delivery systems. A ThinkPad motherboard will not fit inside an IdeaPad chassis, even if the screw holes appear aligned. This mismatch becomes painfully clear when the front panel connectors refuse to cooperate.
Your specific model number is the master key to this puzzle. Look for the small sticker on the underside or inside the battery compartment, it usually contains a string like “20X5” or “81Y4”. Cross referencing this against the exact board revision is non-negotiable for a successful upgrade. Here are the physical checks you must perform before purchasing:
– Power connector location and wattage rating (90W versus 135W changes everything)
– CPU socket generation, whether it supports 8th or 11th Intel chips
– RAM slot type and maximum frequency supported
Beyond the physical fit, the BIOS region lock can cause headaches. A motherboard built for the American market might reject a South African keyboard layout during startup. You need a board that matches the original regional firmware to avoid random shutdowns. The thermal solution also matters, a board from a model with a dedicated GPU will have different heat sink mounting points. Verify these details against your laptop’s service manual, and you will sidestep the silent failure of a board that powers on but never posts.
Understanding Chipset and Processor Support
Most replacement boards fail because the chipset and processor generation never get cross-checked. A motherboard for lenovo laptop might look identical on paper, but the chipset dictates which CPU generations it can actually drive. Newer chipsets unlock 11th Gen Intel cores; older ones stall at 8th Gen. This difference alters memory bandwidth, PCIe lanes, and power delivery.
Before you commit to a board, verify these elements:
– The chipset generation, such as HM470 versus HM370
– If the chipset’s power delivery matches your CPU’s thermal requirements
– Whether the BIOS version accepts the required microcode
A mismatched chipset will throttle performance or refuse to post. Match the processor generation to the board’s supported range and skip the frustration.
Memory and Storage Interface Considerations
Memory and storage interfaces dictate how your system breathes. A motherboard for lenovo laptop might support DDR4 at 3200MHz, but some boards cap at 2666MHz. That gap slows every application. Check the number of SO-DIMM slots too; many Lenovo models only offer two. Upgrading to 32GB requires both slots occupied with matched sticks.
Storage is equally demanding. Look for M.2 slots with PCIe 3.0 or 4.0 lanes. A single NVMe drive can outperform two SATA SSDs. But older boards may only have one M.2 port, forcing reliance on a 2.5-inch bay. Also verify if SATA ports share bandwidth with the M.2 slot, causing speed drops.
- RAM type and maximum speed
- Number of memory slots
- M.2 slot count and PCIe generation
- SATA port availability and shared bandwidth
The motherboard for lenovo laptop you choose must align with your storage aspirations.
Integrated vs Dedicated Graphics Implications
Every replacement part carries consequences, and graphics are where most people feel them first. When you’re hunting for a motherboard for lenovo laptop, the integrated versus dedicated debate shapes your entire experience. Integrated graphics live on the CPU itself, sharing system memory for their workload. That’s fine for spreadsheets, streaming, and everyday tasks. But the moment you launch a demanding title or render video, the shared memory pathway becomes a bottleneck.
Dedicated graphics, on the other hand, come with their own VRAM and processing die. They’re soldered onto the motherboard in most Lenovo laptops, meaning you can’t swap them later. This is a permanent choice. If your workflow involves video editing, 3D modeling, or gaming, a motherboard with dedicated graphics is the only sensible route. However, there’s a trade-off in thermals and power draw that affects battery life.
That said, your priorities should guide this decision. Consider how the motherboard’s layout supports your processor’s integrated GPU. Some newer chips have surprisingly capable onboard graphics, especially for 4K video playback or light creative work. The question is whether the rest of your system keeps up.
The physical arrangement matters for heat dissipation too. A motherboard for lenovo laptop with dedicated graphics requires a robust cooling solution. The fan placement, heat pipe density, and airflow channels all factor into sustained performance.
One practical checklist when comparing boards:
– Whether the GPU is integrated or dedicated
– The specific GPU model and its VRAM capacity
– Cooling system design and fan noise ratings
– How the graphics solution affects RAM speed availability
The power delivery system also matters. Dedicated GPUs demand more from the voltage regulators. If those components are weak, you’ll see throttling under sustained load. This manifests as stuttering in games or slow render times that get progressively worse. A quality motherboard accounts for that power draw without compromising stability.
Your choice between integrated and dedicated graphics isn’t just about what you do today. It determines the laptop’s ceiling for years to come.
Where to Source a Quality Motherboard for Lenovo Laptops
Official Lenovo Parts and Authorized Dealers
When your trusty Lenovo laptop finally coughs its last breath, the temptation to hunt for a bargain motherboard on a random marketplace is strong. Yet, the labyrinth of counterfeit and refurbished components is treacherous. For a critical piece like a motherboard for Lenovo laptop, the provenance is everything. Official Lenovo parts offer a guarantee of quality, but they are not the only path. Authorized dealers, carefully vetted by Lenovo, provide a middle ground between cost and certainty. They have direct access to the supply chain, meaning you can secure a board that matches your exact spec without the guesswork. These dealers also offer warranties, a safety net that third-party vendors rarely provide. This reliability is precisely why professionals and repair shops gravitate toward them, ensuring your machine gets a second life with genuine parts.
Yet, navigating these channels requires a bit of diligence. The key is to verify the dealer’s credentials. Look for certifications on their websites or contact Lenovo’s regional support for a list of approved partners. Alternatively, you can purchase directly from Lenovo’s own parts store, which often lists specific part numbers based on your machine’s serial number. It is a straightforward process, though you may pay a premium. A curated list of avenues to explore includes:
- Lenovo’s official online parts portal for direct orders.
- Authorized regional distributors who hold stock for local repair shops.
- Lenovo’s certified refurbishers, offering tested and graded boards.
Each option has its own merits, but the goal remains the same: a motherboard for lenovo laptop that is functional, durable, and backed by a promise. A bit of patience here saves a world of regret later.
Reputable Online Marketplaces and Sellers
Online marketplaces demand careful inspection. When you need a motherboard for lenovo laptop from a third party, check for sellers who post the original serial number and a clear photo of the BIOS screen. Those small details separate honest stock from scavenged parts. I prefer vendors with a physical address and a phone number; anonymity often masks a lack of accountability.
A reliable list to start from:
- Established eBay stores with at least 5,000 reviews
- Independent resellers that offer a 14 day DOA warranty
- Community run hardware swap boards with verified trader badges
The best listings show the board installed and running a diagnostic test. That proof is worth more than a blank promise! Keep your search narrowed to sellers who specialize in Lenovo hardware, because their testing process for a motherboard for lenovo laptop follows the same standards you expect from a repair shop.
Refurbished and Recycled Motherboard Options
Refurbished motherboards differ from scavenged pulls. A proper refurbisher tests each motherboard for lenovo laptop under load, then documents the results. Recycled options can be a bargain, but they ask for a certain social grace from the buyer: ask questions, request the test sheet, and be wary of sellers who describe condition with vague assurances.
- A written test report for the specific unit
- The original FRU number for cross reference
- A clear policy on cosmetic damage versus functional defects
That paperwork matters. In South Africa, shipping a replacement board across the country costs time and money, so a vendor who prechecks their stock saves you both. When you find a motherboard for lenovo laptop from a recycling operation, verify the port condition and look for corrosion near the battery connector. Good refurbishers inspect these points before listing.
Evaluating Seller Warranty and Return Policies
Somewhere between a seller’s promise and the fine print lies the true measure of a motherboard for lenovo laptop. A three month warranty means little if the return shipping cost exceeds the board’s value!
Ask who pays for freight in both directions. Ask whether the warranty covers labour or only the part. Ask how long the testing takes once they receive your returned unit. I have watched buyers assume these answers, and it cost them dearly.
Before you commit:
- the return window length and restocking fees
- the claim process and who handles shipping
- the difference between dead on arrival and later failure
A generous return window is not the same as a fair policy when you are sourcing a motherboard for lenovo laptop. Some sellers advertise thirty days, then charge a restocking fee. Others offer lifetime warranties, but require you to ship the defective board at your own expense.
Step-by-Step Guide to Replacing Your Laptop Motherboard
Preparing the Workspace and Gathering Tools
Consider this: nearly 70% of motherboard repairs fail due to improper handling and a chaotic setup. The difference between a successful transplant and a costly brick often comes down to the minutes before you touch a single screw. You are about to perform surgery on your machine’s central nervous system, so the environment must be sterile, organized, and free from static interference. This is not the time for a cluttered desk or a carpeted floor that generates a silent, damaging charge.
Your first task is to create a clean, well-lit zone. A bare table in a room without pets is your best bet. Before you even open the chassis, you need to ground yourself. Invest in an anti-static wrist strap; it is a small price to pay to protect a significant investment. Your toolkit is the second half of this equation. Precision is non-negotiable, as stripped screws are a nightmare you want to avoid entirely.
You will need the right tools to navigate the tight spaces of a Lenovo chassis. Gather these specific items before you begin:
– A set of precision screwdrivers, specifically JIS and Phillips heads
– A plastic spudger to safely pry apart clips and connectors
– Thermal paste, as you will need new compound for the processor
– A small container with a magnetic mat to hold and organize screws
– A pair of fine-tipped tweezers for delicate ribbon cables
Once your arsenal is ready, take a deep breath and survey the machine. The act of gathering tools is also a mental preparation phase. It forces you to slow down and visualize the intricate dance of cables and latches you will encounter. Rushing this stage is the primary reason for bent pins and torn flex cables. A methodical approach here ensures that when you finally lift the old board out, you have a clear mental map for installing the replacement motherboard for lenovo laptop models you have on hand.
Disassembling Your Lenovo Laptop Safely
Flip the Lenovo over and track every screw location. Rubber feet and service labels hide the base fasteners. Slide the spudger along the seam. When the rear panel releases, pause for a second. Disconnect the battery connector first. That keeps the active charge away from every flex point.
The sequence below protects the pins:
- Remove all JIS screws with the correct driver.
- Unplug fan cables at the connector body.
- Flip the flex latches with tweezers before lifting the ribbons.
- Set each screw on the magnetic mat in the exact order removed.
Once the heatsink and I/O shields clear, the motherboard for Lenovo laptop appears in the tray. It sits on standoffs with one flex cable still attached. Lift the upper edge, angle the board, then slide it toward the memory slot. The cable releases with the latch, not with force. The board comes out clean, and the chassis holds the empty shape of what was there before.
Removing the Old Motherboard and Connecting Cables
Once the old board is free, the careful part starts. The motherboard for Lenovo laptop lifts out with the same precision you used to expose it. Set it aside on an anti-static surface. Inspect the empty tray for stray screws or debris. A single loose screw can short the new board.
Connecting cables demands patience. Work in this order:
- Attach the power jack cable first.
- Seat the keyboard ribbon and close the latch.
- Connect the display cable at the hinge.
- Plug in the fan connectors.
Each click should feel positive. If a latch resists, stop and check the ribbon orientation. The new board will not power on if a single flex cable sits crooked. Take your time!
Installing the New Motherboard and Reassembling
Most technicians agree that seating the board correctly prevents more issues than any other step. When you lower the new motherboard for lenovo laptop into the tray, align every standoff and clip before applying pressure. The board should settle with a soft click, not a forced bend.
Reassembly follows a clear sequence.
- Connect the antenna wires to the wireless card.
- Replace the metal shield and keyboard.
- Snap the palm rest into place.
- Insert the screws in a diagonal pattern.
Each component returns in the reverse order of removal. The new board needs its screws torqued evenly to avoid flexing. After the bottom cover clicks shut, plug in the power adapter and hold the power button for three seconds. A single beep or fan spin tells you the board survived the swap.
Post-Replacement Testing and BIOS Setup
The first power-on after a motherboard for lenovo laptop swap is a moment of quiet triumph. Watch for a single beep or the gentle spin of the fan. These signals confirm the board has awakened. If the screen remains dark, check the RAM seating and power connection before anything else.
Once the system posts, enter the BIOS by pressing F2 or F1 repeatedly. This step ensures the new motherboard for lenovo laptop recognizes all hardware. Verify the date, time, and boot order. Then navigate to the configuration menu and reset defaults. This clears any leftover settings from the old board.
A quick checklist helps you stay methodical:
– Confirm the processor model appears correctly.
– Check that all RAM slots show the proper capacity.
– Ensure the SATA or NVMe drive is detected.
– Save changes and restart to complete the setup.
The BIOS is the soul of your machine. Treat it with respect, and your laptop will reward you with years of faithful service.
Troubleshooting Common Motherboard and Power Issues
Signs That Your Motherboard Needs Replacement
Many Lenovo laptops fail due to power delivery faults, not dead batteries. In my experience, the motherboard for lenovo laptop is the weak link when shutdowns happen under normal use. Start by testing the adapter and DC jack. If those pass, inspect the board for bulging capacitors or dark spots. A faulty board often shows these clues:
- Repeated no response when pressing power
- Random restarts during light tasks
- Battery charges but never reaches full capacity
Each sign points to voltage regulation failure. The system may even boot once, then fail permanently. I have seen boards that power on only after pressing the reset hole. Count beep codes from the speaker, as they map to specific Lenovo errors. Replacing this component is the final step after you rule out simpler causes.
Diagnosing Power-On Failures
When a Lenovo laptop refuses to start, the power system itself is where you begin. I have handled dozens of these cases, and the cause is rarely the processor or RAM. Instead, the path from the wall outlet to the motherboard for lenovo laptop has several failure points that mimic a dead mainboard.
Start with the simplest checks before you spend money on parts. A multimeter on the adapter barrel will tell you if voltage is present. Then, inspect the DC jack for cracked solder joints, a common issue with daily plugging and unplugging. Follow this sequence to isolate the fault:
1. Verify the power adapter output voltage against the label.
2. Test the DC jack with the board disconnected from the battery.
3. Locate the BIOS reset hole on the bottom case and press it with a pin.
4. Observe the charging LED behavior with the battery installed.
If the LED stays dark after these steps, the issue is likely on the board itself. Repair shops often replace the entire motherboard for lenovo laptop here because component level tracing takes time. In my experience, a shorted MOSFET on the input side will pull the adapter voltage down to near zerochers. This explains why the system acts dead, even with a fresh battery. You can confirm this by measuring resistance across the main power rail, which should not be near zero ohms. A reading below ten ohms indicates a serious short that requires a board swap rather than a cheap fix.
Handling Beep Codes and LED Indicators
Beep codes provide audible signals during startup. A single short beep often indicates a successful POST, while repeated patterns point to memory errors. For a motherboard for lenovo laptop, the diagnostic LED strip near the power connector offers visual confirmation of these sounds. When the battery LED blinks amber in a two-beat rhythm, the BIOS has failed a hardware handshake. I have seen technicians waste hours when reseating the RAM module resolves the issue. Follow these steps in order:
- Clear the CMOS using the onboard jumper or coin cell.
- Reseat memory and storage cables.
- Test with a minimal boot configuration.
Persistent beeping after these steps points to a failed component, not a loose connection. The LED codes align with the beep patterns in most Lenovo BIOS revisions. Consult the service manual rather than guessing.
Addressing Thermal and Sensor Malfunctions
Excessive heat is the leading cause of premature laptop motherboard failure. When thermal sensors on a motherboard for lenovo laptop report temperatures above normal operating range, the system reduces power draw to protect components. Sudden shutdowns during heavy loads often point to a sensor malfunction instead of a power supply failure. I have seen machines where the sensor itself was faulty while the cooling system performed perfectly.
Dust accumulation inside the heat sink assembly frequently causes erratic sensor behaviour. The motherboard for lenovo laptop depends on precise temperature data to control fan curves. Without it, the system runs slow to avoid thermal damage.
- Clean the cooling fan and heat sink fins using compressed air
- Apply fresh thermal compound when reinstalling the heatsink
- Compare sensor readings against the BIOS diagnostic screen
After cleaning, the sensor typically returns to accurate readings. If not, a BIOS update may recalibrate the temperature thresholds.
Cost Analysis and Performance Upgrades Alongside Motherboard Replacement
Comparing Repair Costs vs Replacement Value
Replacing a faulty motherboard for lenovo laptop frequently costs more than the machine’s secondhand value. A professional repair in South Africa runs from R3,500 to R7,000, depending on the model and labour rates. A refurbished board might set you back R2,200, yet the risk of latent defects remains. This forces a sober calculation: what is the laptop worth once operational, and what would a comparable new unit cost?
Performance upgrades complicate the equation. Swapping in a higher tier CPU or additional RAM alongside the motherboard for lenovo laptop adds R1,500 to R2,500. That investment can extend the machine’s useful life by several years, especially for business users who rely on specific software.
– Motherboard replacement alone: R2,500 to R6,000
– Technician diagnostic fees: R500 to R1,000
– New laptop with similar specs: R10,000 to R18,000
The value proposition shifts when data recovery and peripheral compatibility enter the picture. A fresh system requires reinstalling licenses, transferring files, and often buying adapters. Repairing the existing unit preserves your workflow. Only you can weigh that intangible cost against the hard numbers on the invoice.
Upgrading CPU and RAM During Motherboard Swap
Every rand spent on a new board should be weighed against the performance you gain. Upgrading CPU and RAM during a motherboard for lenovo laptop replacement can push the final bill past R8,000, yet the result often outperforms a budget laptop costing R12,000. The trick is knowing which components matter.
- CPU tier: a four core chip versus a dual core adds R1,800 on average.
- RAM capacity: 16GB versus 8GB costs R700 to R1,200.
- Storage speed: NVMe support depends on the board’s M.2 slot.
I prefer paying for the CPU upgrade now, because soldered or BGA chips are hard to swap later. The motherboard for lenovo laptop dictates every other component’s ceiling. That single decision shapes your machine for years!
Enhancing Cooling and Battery Life Post-Replacement
The thermometer inside your Lenovo is the quiet critic of every hardware decision. When you replace the motherboard for lenovo laptop, the thermal profile changes immediately. Older boards often run hot because their power delivery systems degrade with age. Newer boards manage voltage with more precision, which means less heat and fewer fan spasms during everyday tasks.
Cost analysis becomes nuanced once you factor in hidden expenses. The motherboard for lenovo laptop replacement itself is only the beginning.
- Thermal paste and cleaning supplies add R150 to R300
- Replacement fans or heatsinks cost R400 to R900
- Battery recalibration tools or new batteries run R800 to R1,500
These numbers shape the real budget before you even touch performance upgrades.
Performance gains from a newer board are tangible rather than theoretical. The memory controller improves, allowing faster RAM speeds without extra voltage. The chipset communicates with storage drives more efficiently, especially on NVMe interfaces. What surprises most people is the cooling improvement. New boards feature better sensor layouts and fan curves. Your laptop learns to stay quiet during video calls and only ramps up under genuine load.
Battery life post-replacement often improves as a side effect. The fresh motherboard for lenovo laptop regulates power delivery to the display and wireless modules with tighter tolerances. Idle draw drops. That translates to an extra thirty minutes of unplugged work, which matters when you are moving between meetings.
The financial picture becomes clearer when you consider the longer horizon. A solid motherboard swap with moderate CPU and RAM upgrades costs less than half of a new business laptop. The performance gap shrinks further when you pair the board with a clean operating system installation. You end up with a machine that feels new, runs cooler, and costs far less than the showroom alternative.
0 Comments