
Motherboard Form Factors Explained
ATX: The Standard Size
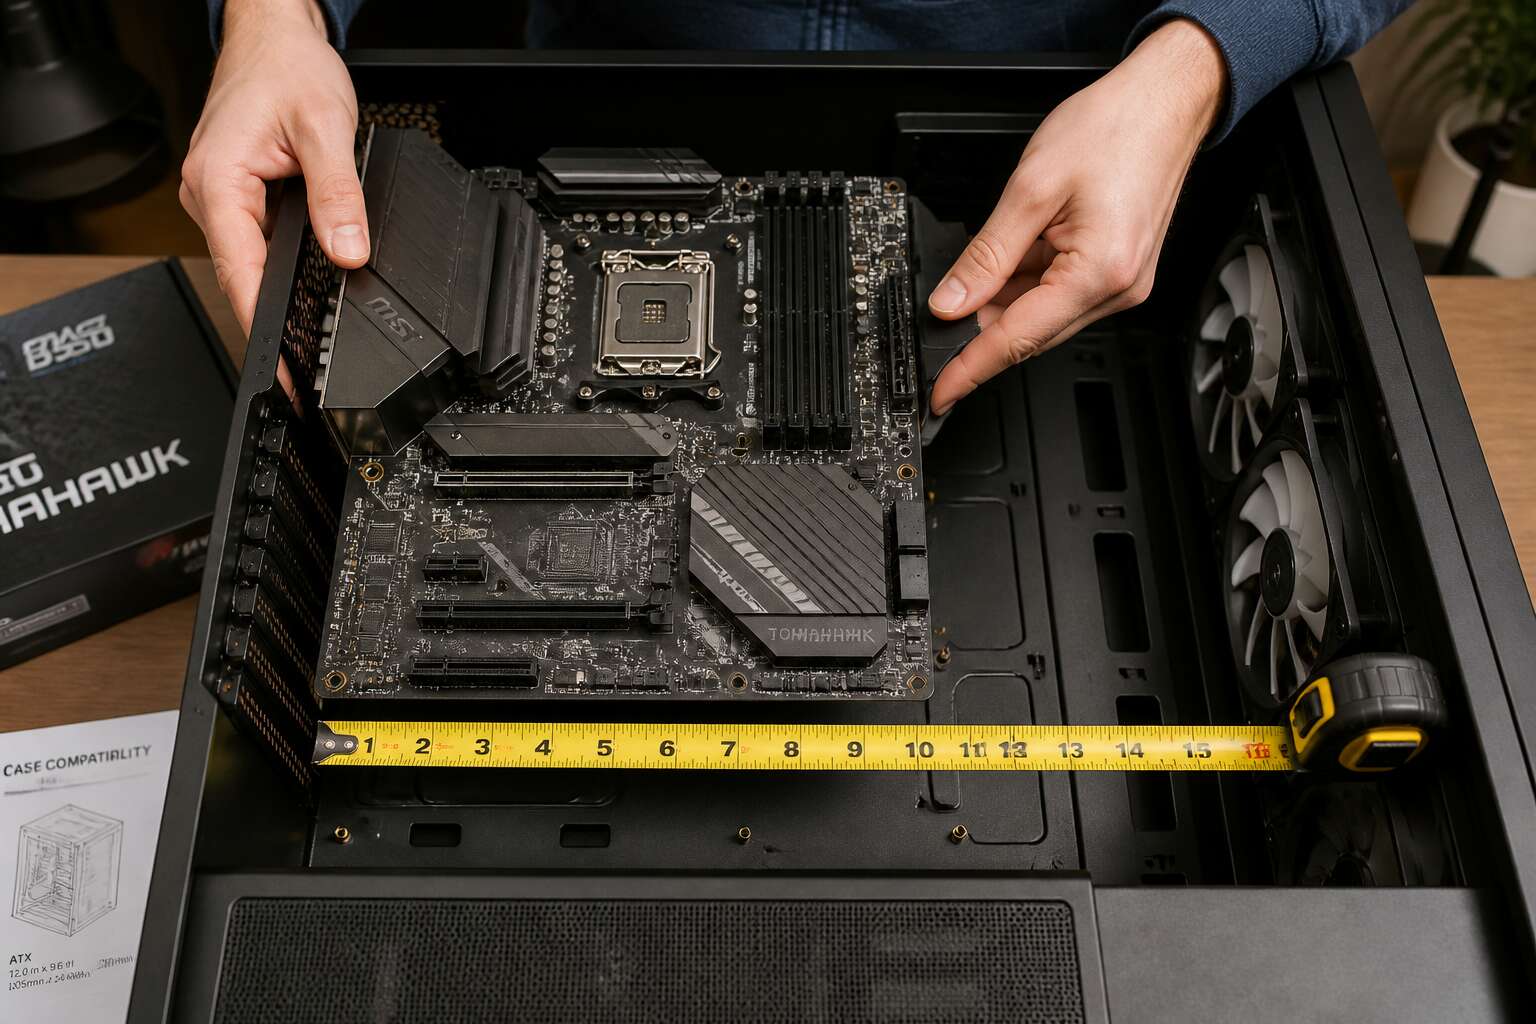
ATX remains the reference point, a 305 by 244 mm board that most tower cases accept. But when you ask will motherboard fit my case, the answer depends on the chassis design, not the label. I have seen a full-tower reject an ATX board because the standoff posts were welded for E-ATX. Check three things before you commit:
- The number of expansion slots, which must be seven
- The position of the CPU cutout on the tray
- The distance from the top edge to the I/O shield
This sounds tedious, yet it saves hours of returning components. The form factor standard gives you a baseline, not a guarantee. Your case manual holds the final word, so read it with the same care you give a datasheet!
Micro-ATX: Compact but Popular
Micro-ATX measures 244 by 244 mm, a square that fits most mid-tower and even some slim chassis. The popularity comes from balance: enough slots for a GPU and two expansion cards, without the bulk of ATX. But when you ask will motherboard fit my case, the answer often depends on the PSU shroud or drive cages. A compact case might accept the board but block the SATA ports.
I have seen builders force a Micro-ATX into a small form factor case, only to find the 24-pin power connector presses against the side panel. The standoffs align, yet the layout kills the build. Check the case’s maximum motherboard size, not the brand name.
- Measure the tray depth
- Check CPU cooler clearance
- Verify the front panel header position
Micro-ATX remains a smart pick for budget builds, but the case manual still dictates the truth.
Mini-ITX: Small Form Factor Choices
Mini-ITX measures 170 by 170 mm, a tiny rectangle that unlocks the smallest cases. But the question will motherboard fit my case grows sharper here. A board can align with standoffs, yet a bulky CPU cooler or a tall RAM heat spreader can jam against the side panel. I once mounted a Mini-ITX board in a slim chassis, only to find the M.2 drive sat directly beneath the graphics card’s backplate. That forced a redesign!
This form factor favors specific components. Standard ATX power supplies rarely fit in true Mini-ITX enclosures. You often need an SFX unit. Check the case’s stated support for GPU length and cooler height before buying anything.
- CPU cooler maximum height
- Graphics card maximum length
- Power supply form factor
The answer to will motherboard fit my case depends on those numbers, not on the board’s size. Measure twice, then commit.
Extended ATX and Other Oversized Boards
Extended ATX (E-ATX) reaches 305 mm by 330 mm. Most mid-tower cases simply lack the interior width for this board. The question, will motherboard fit my case, comes down to measurements. The board aligns with standoffs, then covers cable routing holes and crowds the power supply shroud. The side panel refuses to close without force.
XL-ATX stretches further, and HPTX boards reach 356 mm. These require full-tower cases and power supplies with serious wattage.
- Check the case’s stated E-ATX support before ordering
- Measure the board’s actual width, some E-ATX boards are narrower
- Verify PSU clearance, oversized boards cover front mounts
Will motherboard fit my case depends on interior depth, not standoff holes. Measure twice, commit once.
How to Measure Your PC Case Interior
Locating the Motherboard Tray
Most people measure their PC case interior only after buying a motherboard that refuses to cooperate. The motherboard tray, that flat metal panel where everything mounts, is your true starting point. Locate it and you will find standoffs, which are brass pillars that hold the board. Their pattern reveals which shapes your case accepts.
Measure the distance between standoff holes, then check the width and height of the tray opening. Compare those numbers against the board’s dimensions. The answer to will motherboard fit my case lies in those measurements.
A quick checklist helps:
- Standoff spacing
- Tray opening size
- CPU cutout clearance
Those three items cover the essential traps.
Measuring Standoff Positions
The question of whether a motherboard will fit your case is often answered too late, after you have already committed to a board and a case that are now locked in a silent, incompatible standoff. Measuring the interior of your PC case is less about complex geometry and more about respecting the physical boundaries of the tray itself. You are not looking for aesthetics here. You are looking for a functional match between the brass standoffs and the mounting holes on your chosen board.
To begin, you need a ruler or a tape measure. The process involves checking the distance between the standoff holes, which are the threaded pillars on the tray. This spacing is the definitive language of compatibility. A board designed for a larger form factor will have holes that simply do not align with a smaller tray. The measurements you take will tell you the true story of the tray’s capacity, removing any guesswork from the equation.
When you survey the interior, consider the following critical dimensions:
– The width and height of the tray opening itself.
– The specific distance between the top and bottom standoff rows.
– The clearance around the CPU cutout for cooler backplates.
These figures, when compared against the board’s dimensions, will give you a definitive answer to will motherboard fit my case. The width is often the most restrictive factor. Many cases taper or have rounded corners that reduce usable space, so a quick check of the raw numbers is the only way to avoid a frustrating assembly session.
Checking Clearance for CPU Coolers
A tower cooler can easily add 160 millimeters above the motherboard, and that height often becomes the deciding factor for your build. Measuring the interior for this clearance is separate from standoff spacing. You need to know the distance from the CPU socket to the side panel, not just the tray dimensions.
Start by placing a ruler vertically through the CPU cutout and close the case gently to mark the true limit. The sequence requires three checks:
- Measure from the socket surface to the panel interior.
- Subtract the cooler’s total height from that figure.
- Account for the backplate thickness behind the tray.
The case width usually determines this number, especially when a glass panel bows inward. A narrow measurement forces a low-profile cooler, or you face a different compromise. This vertical check, combined with standoff alignment, answers will motherboard fit my case without guesswork. The answer to will motherboard fit my case goes beyond hole positions; it lives in the empty air above the board.
GPU Length and Expansion Slot Limits
The swift evolution of graphics cards means that interior space, not just motherboard holes, determines your final assembly. Half of all modern GPUs stretch beyond 300 millimeters, a dimension that swallows drive cages and can obstruct front mounted radiators. Measuring this path is practical and direct. Begin with a tape measure from the rear expansion slots to the deepest obstruction inside the chassis. The power supply shroud, especially in budget South African cases, often eats into that allowance.
Expansion slot limits are a secondary concern, yet they are equally precise. A full tower might offer eight slots, while a compact chassis offers four. The GPU’s thickness determines how many you actually use. A chunky, triple slot cooler leaves no room for a capture card or a sound module. This physical count matters for your build.
Here is how to avoid a costly mismatch:
1. Measure the distance from the rear I/O panel to the case’s front interior.
2. Subtract 20 millimeters for cable management and connector bends.
3. Compare that result with the GPU’s official length.
4. Check the expansion slot cover count against the card’s thickness.
Ultimately, the answer to will motherboard fit my case rests on this spacing. The slot count and the length clearance are the final arbiters for your hardware, turning a simple question into a precise measure of interior volume.
Cable Management and Depth Allowance
The rear cable channel is where many builds fail. A motherboard can align perfectly with the standoffs, yet fail to fit once the 24 pin cable bends toward the PSU shroud. That bend consumes almost 20 millimeters alone. The question of will motherboard fit my case extends past the tray and into the cable channel behind it.
Many budget South African cases offer only 25 to 35 millimeters of rear depth. In my own builds, a modular PSU’s cables pressed hard against the side panel until I factored this gap into the layout. The contact points that matter here are:
- The grommet spacing along the tray edge
- The connector height on the rear I/O
- The flex point of the thickest cable in the kit
Each occupies the same interior volume as the motherboard itself. Once accounted for, the answer to will motherboard fit my case comes from the tape measure, not from product photos.
Key Compatibility Factors Beyond Physical Size
I/O Shield and Rear Panel Alignment
Physical dimensions alone do not guarantee a proper fit. The I/O shield and rear panel alignment often decide the answer to will motherboard fit my case. A case might accept a full ATX board, yet the rear ports sit misaligned.
The shield is a thin metal frame. It must snap securely into the case’s rectangular opening. Check that the cutout matches the shield’s outline. Also, verify the USB and Ethernet ports line up with the shield’s apertures. A slight deviation causes intermittent connections.
When inspecting a case, pay attention to these details:
- Measure the opening’s width and height.
- Confirm the shield’s tabs align with the case’s retention points.
- Ensure the rear panel sits flush, not recessed.
In my experience, a 1mm offset creates noticeable issues with port alignment.
Mounting Holes and Standoff Layouts
“Measure twice, cut once,” the old builders say. Yet with motherboards, even careful measuring can mislead you. Mounting holes are where compatibility lives or dies, and they rarely align with intuition.
The standoff drill patterns on your case tray are a fixed geography. An ATX board spans nine holes in a specific constellation, while Micro-ATX uses six. A case with proprietary layouts, common in prebuilt systems from Johannesburg to Cape Town, will reject a standard board outright. You can verify this before purchasing by removing the side panel and counting brass standoffs already installed.
Occasionally, cases ship with universal trays offering multiple patterns. These forgive more mistakes. However, the real test comes when you set the board gently onto the tray and sight down each hole. For a thorough check:
1. Confirm every standoff aligns with a solder point on the board.
2. Check that no stray standoff sits where the board has no hole, as this causes short circuits.
3. Look for extra posts that require removal with pliers.
Manufacturers sometimes share standards. Many cases accept both ATX and E-ATX by adding extra standoffs in longer positions. But some oversize boards use a wider pattern altogether, so the question of will motherboard fit my case becomes an exercise in reading specification sheets, not just physical measurement. The answer ultimately lives in those small threaded posts.
Connector Placement and Front Panel Wires
Connector placement creates issues that tape measures never reveal. The front panel wires from your case, those thin bundles for power, reset, and activity lights, reach only so far. A motherboard with headers positioned near the top edge will challenge a case whose wiring routes along the bottom. The question of will motherboard fit my case then depends on wire length and header orientation.
- Front panel headers may sit beside the DIMM slots instead of the board edge.
- USB 3.0 internal headers vary in location and clearance with long GPUs.
- Audio and USB 2.0 headers often hide behind drive cages.
Manufacturers place connectors according to board layout, not case design. A prebuilt case from a local brand may use proprietary wire bricks. Standard boards fail to connect or force awkward bending. Physical size alone never settles the matter.
Power Supply Clearance and Cable Reach
Your power supply does not care about your motherboard’s feelings, but it does care about space. The question of will motherboard fit my case often ignores the chunky metal box that feeds it. A protruding fan grille or modular port block can press against the board tray, bending capacitors. Measure the gap between the PSU shroud and the board’s edge, not just the case’s depth.
Cable reach is the underrated menace. CPU power headers sit at the top left, yet many cases route their cables from the bottom. A short 8-pin wire forces an extender or awkward zip-tie gymnastics. Always check each cable’s path from the PSU mounting point to its header. Some PSUs have short 24-pin leads, and modular designs add extra length at the connector block itself.
- PSU length includes the bundle of cables, not just the metal shell.
- The CPU power lead must clear the top edge and any rear fan.
- Sideways modular ports eat into motherboard clearance.
RAM Height and Heatsink Overhang
When you ask will motherboard fit my case, the bare board often slides in without drama. The trouble begins with RAM. Tall heat spreaders on high-performance memory kits rise far above the socket, and they can press against a radiator or a side-mounted fan. The DIMM slots sit near the CPU, so clearance is tight from the start.
Heatsink overhang creates a different problem. A bulky tower cooler extends beyond its bracket, hovering directly over the first memory slot. Swapping RAM afterwards means removing the cooler first.
Check these dimensions:
– The gap between cooler fins and RAM heat spreaders
– The internal case width with the side panel closed
Those two measurements determine whether will motherboard fit my case once everything is installed.
Expansion Slot Alignment and Bracket Fit
Expansion slot alignment often gets overlooked. As you check will motherboard fit my case, verify the PCIe slots line up with the rear bracket openings. A few millimeters off means a card won’t seat properly, especially on cases with non-standard slot pitch.
Bracket fit also depends on the height of the slot covers and the thickness of the rear panel. Tool-less retention systems vary, so test with a card before installing the board fully.
- Measure the distance from the tray to the slot covers
- Count the expansion slots against your motherboard layout
The real answer to will motherboard fit my case includes these details. Mismatched brackets force the card sideways, which stresses the slot and shortens its life. Patience during alignment prevents that damage.
Online Tools and Resources to Verify Fit
Reading Manufacturer Specification Sheets
In the dim glow of your monitor, the question “will motherboard fit my case” often finds its stark answer only in the manufacturer’s specification sheet. These documents, though dense, contain the exact dimensions and other parameters that no retail listing promises. Several online resources can help you interpret them.
- PCPartPicker aggregates user-submitted compatibility data.
- The manufacturer’s official website often hosts updated CAD files and PDFs.
- Technical forums archive measured clearances from actual builders.
Cross-referencing these against the physical case tray in front of you remains the final arbiter. No digital tool replaces the simple act of measuring with your own ruler. The spec sheet tells you the truth, but only if you read every millimetre and every note. That is how the mystery resolves.
Using PCPartPicker Compatibility Checker
Before you dive into physical measurements, there is a faster way to answer “will motherboard fit my case.” The PCPartPicker compatibility checker does much of the heavy lifting. You select your case and motherboard from a shared database, and the tool flags obvious mismatches.
It relies on user-submitted builds and manufacturer data. This means the results reflect real-world experience, not just theoretical specs.
To use it effectively, you can:
– Add your chosen case to the build.
– Select the motherboard you want.
– Review the compatibility notes.
The notes often include part revisions and BIOS version warnings. That level of detail saves time, but it should never replace a careful look at the actual hardware.
Studying Case Review Diagrams and Photos
The real answer to “will motherboard fit my case” often lives in the details that spec sheets overlook. Online reviews with high resolution images are worth their weight in gold. You can zoom into the motherboard tray to see where the standoffs are pre-installed and how much room remains around the edges. This visual check reveals surprises, like a poorly placed SATA port that a specification sheet might not mention.
When you study case review diagrams, pay attention to the depth measurement behind the motherboard tray. This dimension is critical for cable routing, but is rarely advertised clearly. Look for pictures that show a completed build. They offer the most honest perspective on how the hardware works together in reality.
Some reviewers provide a breakdown of their own build process to verify compatibility. This is where you find useful insights:
– Look for photos of the I/O shield sitting flush against the case frame.
– Examine the gap between tall RAM modules and a top mounted radiator.
– Search for angles that show front panel connectors near the bottom edge.
These visual resources confirm or contradict the data from calculators. They show you the physical reality of the space. Cross referencing several builds with similar parts on a forum will give you the confidence that your chosen components will settle in without a fight.
Consulting Community Forums and Build Logs
Online calculators give a preliminary answer, but the question of will motherboard fit my case demands more than arithmetic. I have found that manufacturer websites often host 3D model viewers for their chassis. These allow you to rotate the interior and inspect obstruction points.
Community forums are the human ledger of compatibility. Build logs act as sworn testimony, showing actual parts seated in actual frames. Search for your exact motherboard model and case model together.
- Look for posts with photographs of the tray from multiple angles,
- Check for comments about standoff alignment quirks,
- Note any user reports of tight fits near the PSU shroud.
Reddit and South African tech forums like Carbonite provide regional insights. A 3D viewer confirms dimensions; a build log proves them. Both resources settle will motherboard fit my case before you spend a rand.
Step-by-Step Visual Inspection Checklist
Removing Side Panels and Clearing Obstructions
The moment arrives when speculation yields to certainty. With the side panels unlatched and set aside, the case’s interior stands revealed, a hollow chamber waiting for its vital organ. This visual inspection is as much about ritual as it is about reasoning, a tactile confirmation that your chosen components will coalesce into a working machine. Clear away stray cables and drive cages that might impede the motherboard tray; an unobstructed view prevents errors. Your hands now become the primary tool for the preliminary compatibility survey.
Many builders overlook the drama of the I/O shield cutout until it is too late. A simple glance will answer the question of will motherboard fit my case regarding the rear panel.
– Confirm your case offers a cutout for the integrated I/O shield.
– Check that no riveted brackets obstruct the motherboard tray’s central plane.
– Verify the standoff posts are not pre-installed in conflicting positions.
Every corner of the chassis holds a clue for the will motherboard fit my case scenario. Run a finger along the tray’s edge to detect burrs or misalignments that could short-circuit the board. Satisfied that the path is clear, you can proceed with confidence.
Comparing Screw Hole Patterns Visually
Place the motherboard against the tray, not yet securing it, and let the board settle. Examine the edges. The mounting holes create a pattern that must align precisely with the standoff posts below. A single hole over bare metal means the will motherboard fit my case answer is no.
Proceed methodically through this visual check:
- Identify every screw hole along the board’s perimeter.
- Compare each hole’s position to the nearest standoff.
- Confirm no hole sits over a vacant mount point.
The pattern either matches or it does not. Trust the eyes before touching a screw.
Checking I/O Port Cutouts and Bracket Shape
The rear I/O cluster is a fixed landmark. Its cutout must match the motherboard’s port arrangement with millimetre precision. A board designed for a different bracket shape will leave gaps or force ports into misalignment. This is where the question will motherboard fit my case becomes a matter of geometry, not guesswork.
Inspect the cutout’s dimensions against the motherboard’s port panel. Check the height of the bracket, the width of the opening, and the position of any ethernet or USB groupings. Many cases offer removable I/O shields, but others feature a stamped opening that cannot be adjusted. A mismatched cutout here means the board will not seat flush. The standoffs may align, the screw holes may match, yet the ports will refuse to cooperate. Trust the shape, not the promise of compatibility.
Performing a Test Fit Without Screws
Start with a visual inspection. Place the board on the tray and line up each mounting hole. Watch for a loose standoff with no matching hole, that metal nub can short a circuit. Check for kinked wires or burrs. Your eyes are quicker than a tape measure. Next, perform a test fit without screws. Lower the board in, I/O panel first. Does it rest flat? Press each corner gently. Rocking means a standoff is hitting the wrong spot.
Quick checklist during your pass:
- standoffs aligned with the holes
- burrs or debris on the tray
- cables wedged under the edge
Slide the board away, then lower it again. It should settle without force. If it fights back, you know will motherboard fit my case is a clear no. Always ask will motherboard fit my case before adding a single screw.
Inspecting for Pre-Installed Standoffs and Risers
A standoff can look perfectly aligned from above while still being the wrong type. Some trays mix brass hex standoffs with stamped steel variants. The threading pitch and height differ, which changes how the board sits. A visual pass needs to confirm the standoff type, not just its position. Note the finish. A scratched or discoloured standoff might be corroded, which affects grounding. Do not assume fresh hardware is defect free either. Manufacturing tolerances vary.
Inspect the risers that route front panel audio and USB. These cables can be braided or flat ribbon style. A kinked ribbon cable pressed against a sharp tray edge will fault over time. Check the routing path for strain relief. You want slack, but not a loop that pushes against the board’s underside. A tight cable pulls on the header, which leads to intermittent connection errors.
– Confirm each standoff is the same height
– Check for any metallic paint flakes near the mounting holes
– Look for adhesive residue from cable tie mounts
– Verify riveted standoffs are fixed firmly
Risers carrying power for additional fans can have exposed pins. A stray wire touching the case floor creates a short. Use a flashlight to trace each riser’s full length. Some cases include a pre-routed cable behind the tray. That is fine, but the connector end should be seated cleanly.
The tray itself might not be flat. A warped tray happens after shipping or a heavy GPU install. Place a straight edge across the tray’s width. Any visible light under the straight edge means the surface is bowed. A bowed tray places stress on the PCB’s corners. Over time, a subtle bend cracks solder joints on the memory slots. This is rare but it occurs. After checking the standoffs and risers, the final visual cue is the tray’s reflection. A perfectly flat tray reflects light evenly. Distortions reveal hidden imperfections. The answer to will motherboard fit my case often lies in these small production details. You can measure every spec correctly, but the visual inspection catches what numbers miss. Trust the process. If the board does not sit flush, the answer is clear. Will motherboard fit my case is a question resolved by observation, not guesswork.
Common Mistakes That Lead to Incompatibility
Ignoring the Case Manufacturer’s Size Limits
Many builders obsess over CPU benchmarks and GPU memory speeds, yet they never measure the metal box holding everything together. The most common failure comes from ignoring the case manufacturer’s size limits, a mistake that only surfaces after the side panels won’t close. I have seen builds where the motherboard tray fits perfectly, but the board’s heatsinks grind against a pre-installed fan hub.
The question of will motherboard fit my case is answered by numbers, not hope! Check the case’s official spec sheet for maximum motherboard size, because a shift in standoff placement or a raised cable grommet can eat millimeters. A deep case designed for an Extended ATX board might physically accept a Mini-ITX, but that doesn’t make it correct. Use a ruler if necessary. This simple step can save you from learning the hard way that will motherboard fit my case depends on those digits.
Overlooking CPU Cooler and RAM Height
I have watched builds fail by a few millimeters. The CPU cooler overhangs the RAM slots, and the side panel bows outward. You measure the board and the case, but the vertical space where heat sinks and DIMM clips live is where the failure happens.
Most modern tower coolers exceed 155 millimeters, pressing against the glass or metal. Tall RAM modules, especially those with decorative fins, block the first PCIe slot entirely.
- Compare cooler height to the case’s published limit.
- Align RAM height with the cooler’s fan placement.
- Inspect the motherboard tray for raised back plates.
Will motherboard fit my case becomes a question of angles. The gap between the memory clips and the cooler bracket settles it. One misread spec sheet leads to a rebuild before power-on!
0 Comments